Wednesday, November 30, 2011

How to Make Cupcakes From Pancake Mix


In a very sad turn of events my husband was let go from the trucking company he worked for. Not fired, just let go. In that same week my car broke down. My car was amazing on gas mileage and his truck sucks. We had to choose between gas and food. We had to apply for food stamps.

Food stamps are a funny thing. I’m very grateful for them; don’t get me wrong, they make sure you can eat. But, on the other hand, they make your diet very poor and lacking in serious nutritional content and variety.

Matthew’s foods are covered. He only eats pizza and spaghetti just about. I however, was finding myself very frustrated cooking the same cheap things over and over again.

I was staring at the cabinet, looking at all of our boxes and cans (food stamps don’t really give you the luxury of fresh produce) and thinking, “what could I make for breakfast?”

So, here I give you, muffins/cupcakes from pancake box mix

Ingredients:
Pancake Box Mix                                              Water
Vanilla                                                                   Cinnamon
Cupcake Pan                                                      Fork & Cup
Optional: Frosting

I always mix my pancake mix in a cup or a measuring cup instead of a bowl so you can just pour it. Also, if you are, also on food stamps and you want icing or other things you can’t afford. I just write or email the company that makes it and tell them how amazing/horrible I think their product is and I normally get coupons or even if I’m lucky I get a coupon for a free one. The icing was free that way.

Step 1: Set Oven to 350*. Pour Pancake mix in the cup. Make sure there’s still enough room to add the other ingredients or add more pancake mix.

Step 2: Add Vanilla and Cinnamon and Sugar. I lived in the Middle East for a while so I consequently add cinnamon to EVERYTHING I cook. You’ll notice I’m not using any measurements. That’s because it needs to be made to taste and you can make it no matter how much of the ingredients you have. If it tastes good to you then that’s enough.


Step 3: Add water. Add a little at a time so that the batter gets to the right consistency. You want it to be like cake batter. If you add too much water, no big deal, just add more pancake mix till you get it right. That’s why you left room in the top.

Step 4: Put little paper cups in the muffin pan. Or, if you don’t have paper cups, spray with non-stick cooking spray. If you don’t have spray use a little bit of oil on a piece of wax/regular paper. Anyway you do it, make it slick ‘cause this stuff sticks.

Step 5: Pour the batter into the cups half full. When the oven is preheated put them in. Mine cook best for 10 minutes. They are prefect at that time. Yours however, might take longer or shorter. They are done when you put a toothpick or knife in the middle and it pulls out clean.

After that you can ice them or just eat them plain. I ice mine. It might also work to sprinkle a little bit of sugar on the top of them before you put them in the oven.

Have Fun! If you make them send me pics! 

Tuesday, November 29, 2011

That's the stupidest thing I've ever heard


I just read an article from the San Francisco Chronicle about an 8 year old, 200lb boy that got taken away from his mom because he was so obese. “They” consider it a form of medical neglect. He is supposed to weigh an average of 60lbs. I don’t agree with how medical professionals calculate obesity using BMI, however, my little brother was recently 8 years old and he did not weigh 200lbs. He was more like 70lbs.
It took 20 months to get to the decision to place him in foster care and the decision was approved by a judge. I agree with their choice. I agree with their choice for several reasons.

The boy has developed sleep apnea. Both my father-in-law and my dad (who are obese, but in a really awesome snuggly type way) have sleep apnea. They have to wear c-pap machines when they sleep. It’s really intense. Do you know what happens with sleep apnea? YOU STOP BREATHING IN YOUR SLEEP!!!!!! THIS MOM LET THIS KID GET SO FAT HE STOPS BREATHING IN HIS SLEEP!!!! He is 8. That’s freaking ridiculous.

Do you know how easy it is for kids/men to lose weight? Seriously, just don’t give the kid refined sugars and not as much carbs. Women have all sorts of “female issues” that interfere with weight loss like hormones and water retention. My husband wanted to lose ten pounds and he just stopped eating sweets for a week and he lost it. Don’t let your kid have candy or processed foods or refined sugar and *GASP* play with him outside for an hour a day (crazy idea I know) and BAM! Your kid loses weight.

Obesity kills. It’s a fact. If you let your kid get that obese, you are killing your kid. Diabetes, heart disease, and high blood pressure, I mean, the list goes on and on about the effects of obesity on the body. If the body is a child’s body, the effect of all that weight on the skeletal system alone makes my head spin.

If it is a psychological reason why this kid is so obese, or, if the mom is very obese then she needed to get outside help. She had 20 months to do that. That’s almost 2 freaking years. That means this poor freaking kid has been so overweight for that long. That’s just sad. He needs a better chance and if being put in foster care will help him then I am all for it.

After all, if he is in foster care all she has to do is comply with what the court tells the mom to comply with to get him back. I hope she can do it. Seems like her lawyer, Sam Amata, says "We don't feel there's that kind of requisite danger," 

That kind of thinking in and of itself if dangerous, and, that poor kid's quality of life hangs in the balance. Sad. 

And now, to lighten the mood, a picture of my not-obese son, Tank! So adorablez. 


Monday, November 28, 2011

How to Make a Crinkly Dog Toy


I bought Tank some Frisbee’s for Christmas that are really floppy and rubbery. I bought Panzer a bed because up until now she was just sleeping on a nasty old blanket because she wasn't completely potty trained. She’s ready for a “big girl bed” now. Matthew (aka: the best puppy dad ever) was standing outside of Orschelin at 6am, by himself, on Black Friday to get her the bed for $6.

I was kind of stumped on what her other present should be until I caught her playing with an empty plastic soda bottle. She loved playing with it because I think she likes the noise.

I’ve seen those stuffed animal type toys with the Velcro opening to put the plastic bottle in the bottom. I looked all over the place but the cheapest ones I saw were $9 each. So, yea, I’m obviously not paying that much.

So here you have a crinkly plastic bottle dog toy tutorial.
What you need:
Plastic Bottle                                      Box of Fabric Scraps                        Optional: Velcro
Scissors                                             Needle and Thread

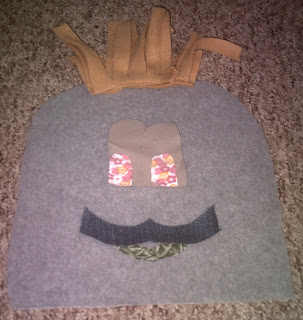
1st: Pick out a fabric that is durable and is interesting to chew on. It needs to be big enough to loosely fit around the plastic bottle. For this I used a big square of grey fleece that I used for Panzer’s Tin Man Halloween costume. It has some stretch to it and it’s fuzzy but not too fuzzy. Cut it into a rectangle that can loosely fit around the bottle.

2nd: Lay the rectangle out in front of you right side up, (fuzzy side up). Get your box of fabrics and cut out its face, or decorations, or whatever. You can give it “hair” too if you want. I’m using some of the strips of “mane” from Tank’s Cowardly Lion costume. I also gave my little guy eyes with pupils, a mustache, and a little mouth.


3rd: Hand-sew to secure any small loose parts. Such as, the little mouth to the mustache and the pupils to the eyes.

4th: Pin the bigger parts after you’ve hand sewn them together to the “face” of the “guy.” Sew them by hand or by machine to the “face.”

5th: Sew the sides together (right sides together). If he/she has hair, make sure the hair is INSIDE the tube or else the hair will be sewn inside the tube and you will have to rip out all your stitches and do it again L.

6th: Turn the tube inside out and put the bottle in its bottom. At this point you have several options. You can turn the edges down and put Velcro on it. That was you can switch out the bottle if you have an aggressive chewer. Or you can turn down the edges and hand-sew it if you like a cleaner seam. Panzer is not so aggressive a chewer and I am lazy so I just pinch the edges together and sew along the bottom.


There you go! Hope you enjoy it and if you make it send me pics!


Saturday, November 26, 2011

When will the R rated comedy just die already?

My husband is watching a dumb movie. White Chicks. He was watching an Austin Powers movie and I was sitting in the room working on something but then he noticed I wasn't laughing and changed it. I hate both of those movies so I just left.

Sequestered in my office, in silence except for the freezing rain pouring outside I can think. I can think about how I hate where mainstream American Cinema has gone. I think about watching old Black and Whites with my Great Grandma. I think about the Golden Age where movies had plots and substance and made you feel good or made you cry or made you really think.

All of the spy movies of today combined are not as exciting or suspenseful as "Charade" with Audrey Hepburn and Walter Matthau.
All the comedies of today combined are not as funny as "Bringing Up Baby" with Cary Grant and Kathrine Hepburn.

It's just gross in our society that looks are taken over substance almost every single time. T&A is better than quality cinematography. It's disgusting that "we" as a society let the Companies shove this stuff in our faces AND they charge us $10 a person AT LEAST to see this sheesh in the theater.
It's repulsive. It's embarrassing. I feel stupider when I partake.

Plot line of an R rated comedy:

Guys/Girls complain that their life isn't cool or exciting
They Make a plan to make it exciting
They do gross, embarrassing, illegal stuff
Troubles happen because of the "stuff"
They have an adventure to try and fix it
Everybody learns a lesson

I think I just summed up a lot of movies for you. Now, feel free to come over to my house because I'm about to watch "Paris When It Sizzles" on my laptop. We can snuggle and I'll make you a hot chocolate.


Sunday, November 20, 2011

HOLY CRAP! I'm coming out! (Against Sopa)

Please go here and do this. If you haven't heard about the new internet censorship bill, read about it and then go to the link and sigh against it. If you love humanity and all that is good i mean.

Unless you know, you want the butt-wads to win.

UPDATE: I GOT A HUGE AMOUNT OF EMAILS TELLING ME THAT MY LINK DOESN'T WORK. Which lets me know that there's a ton of people reading my blog that aren't subscribed to me. That's MEAN! You can subscribe to me using Google + you know. Even my dad AND, my father-in-law have a Google +.
Anyways, here's the long, lame version of the link.
http://americancensorship.org/

If you don't subscribe to me and you read my blog I will think you hate me.

Love,
Me

Wednesday, November 9, 2011

Yea, that's not my hair, that's a dye job.

So, I'm at Mc Donalds again waiting on my dear sweet sister to Skype me.

I put my laptop down at a booth and Douchie McDoucherson in the both in front of me started kicking the bottom of his table really loudly and staring at me so, you know, I have to sit here now. I feel like that's the polite thing for me to do as he apparently so desperately needs attention. I would snap a pic but my phone doesn't have a camera because it's a DINOSAUR, but, it's ok, he's a ginger with a faux-hawk anyways.

But! That's beside the point. The real point today is I am in a mood most foul. Recent events in my family have made me contemplate the meaning of my life and my own little family. How I treat others and if I am a "bad person."

A wise older woman said to me something once that literally blew my life up for a whole year. I was talking to her about my problems with my mom and my dad's and she said to me "Sarah, that is the saddest part of your generation. You do not know how to set boundaries. We as your generation of parents have not taught you how." We then went on to have a long conversation about how boundaries are good and there to help you succeed in life. If something hurts you every time you do it why would you do it anymore?

I know, that every single time I talk to my mother I will scream at my husband for a week. Every single time without fail. Talking to her makes me crazy. Literally crazy. I hate who I am when I am near her. I hate the feelings I feel, I hate the way she looks at me, I hate the way I look at her. I hate how every time she's talking I never hear her words she's actually saying but I hear the horrible things she's said to me my whole life. Like a cassette tape that flips it's self over.

My dad's are sort of the same way. A cassette tape of hateful words. My dad Bryan and I are a lot better off though because he has apologized and made major steps to get to know a little person I like to call "real me." I've apologized too and made efforts to get to know a big snuggly guy I like to call "real vatti."

The biggest issue I still struggle with is the lack of protection that I had from any of my parents.The hardest part is being blamed for things that I had no control over. Things that happened, and words that were screamed at me when I was a child, choices I made. I'm talking, below the age of 16. I hate to tell you this but 16 is still just a kid. I was not protected at all from anything. I was left, alone, to struggle, to raise myself, to make my own choices. I had no idea. Some of those choices impact me today still and some of them in very negative ways. And I am blamed for them, and the consequent choices built upon those destructive foundations by the same people who left me vulnerable. My life is even used as a "cautionary tale" of sorts to my other siblings.

At the age of 25 I finally have boundaries. I refuse to continue to make concessions. I'm not sorry and I won't ever be. I don't expect anyone else to be sorry either. Some day maybe my family will be able to love me, respect me, and accept me and my lifestyle for exactly who I am and what I am and who I choose to be with. Maybe some day they will even make room for me in their close nit clique of snark (though, I'm pretty sure I would not partake). Until then I will have rigid boundaries. I have to protect myself.


Also, ginger-attention whore-man has a chin strap beard. Halfway through this post he sighed really heavily, got up, and left. I didn't get a pic of him as he was leaving.

Friday, November 4, 2011

How to Make Borax Ornaments


First, a word about Christmas presents from me. It all started when, one Christmas, I gave my grandma a candle votive thing for her coffee table and I gave my mom a Japanese birdcage. Several months later my mom said in an offhanded comment "You got your grandma a cool candle votive and all I got was a stupid birdcage." Needless to say I was really hurt. The Candle thing, I got on clearance from Kohls for $7 about 2 hours before I gave it to her. I put a lot of thought into that birdcage and it cost a lot more.

Ever since then, I've made all my Christmas presents, because if you make fun of someone's homemade gift to their face you are a TOTAL ASSHOLE. Plus, all of my family is pretty well off and I can't compete with the Ipod's and the Ipads and crazy electronics they get. I can't compete with that and I'm not going to but, I'm also not going to give everyone a candle and hand lotion box set that has no thought or emotion attached to it that I got from the dollar store a few minutes before I see them. A compromise I came to I guess was to make everyone’s present by hand. It lets me put a lot of time, energy, and love into it while staying within my budget.

This year I have made Borax tree ornaments.
You need:
Pipe Cleaners                    String                    Borax
Cups                                      Hot water            Pot or Kettle

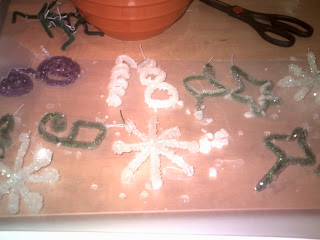
First: Make shapes with the pipe cleaners. We celebrate Christmaka at my house so we have Magen David's, Snowflakes, Christmas trees and everything. My husband made these ones. The ones I made for everyone else are snugly wrapped up with their corresponding cards already. I think his are really adorable though so I'm going to put them on our tree.


Second: Cut other pipe cleaners with wire cutters to be long enough to stretch over the mouth of the glasses you are putting them in. Or, you can use pens and pencils. Use a pencil if your ornaments are going to be really big and heavy. Use string to tie the ornaments to the pencil or pipe cleaner.

Third: Scoop Borax into the cups. Make sure the cups are tall enough to hold the ornaments. I really like to use mason jars because you can see how much liquid they hold. But any kind of clear glass or cup that can hold boiling water can work. The best ratio I've found is 3 Tablespoons per 1 cup is the best. Any less than that and you won't get good crystals. Any more than that and the crystals are freaking huge.


Fourth: Boil water. Pour it while it's still hot into the cups. Stir it in the cup until the Borax completely dissolves. It may or may not be cloudy depending on how much Borax you put in there. Once the water stops swirling, put the ornament in. I put 2 ornaments in a cup because it takes less time to make them and takes less Borax. If you are going to make them then leave them I recommend you put 1 in a glass because sometimes they can touch and fuse together. I don't ever leave the house so I can check on them every couple of hours and push them apart with a spoon if they touch. Make sure you completely cover the ornament with water.


Fifth: After a few hours you will start to see crystals form because the water is cooling. If not, it's because you didn't use enough Borax. No problem, just dump it out, boil more water and do it again with more Borax. I like to leave them overnight. When the crystals are as you want them, take them out of the glasses and dry them on wax paper.

After they are dry you can decorate them however you want it. I tied ribbons around mine and put the hooks in the ribbons so I can hang them on the tree. 

Tank and Panzer helped me big time with this project because it was blowing gale force winds outside and sleeting. So, they had to stay in the kitchen all day.  

Have fun! If you make them send me pics!

Thursday, November 3, 2011

How to Make an Angel Tree Topper


I am on the most amazing sugar high right now. As everyone I'm sure knows, the day after halloween is when all the halloween candy goes on sale. I got 2 marshmallow pumpkins, a bag of gummy starbursts, and a bag of white chocolate candy corn m&m's. I had never heard of these white chocolate m&m's before but when I ate one I had a total "Oh my G-d Francine, these chocodiles, these chocodiles Francine, oh my G-d" moment. They taste like caramel. Seriously. It's so surprising. Go peruse your local discount candy for them. They're amazing!

No segue, sorry.

For a long time I've been looking for an angel tree topper for my christmas tree. I had 3 criteria: really wanted it to be an angel, really wanted it to look kinda artsy, really wanted it to be crafted well (aka: not cheap schlock). 

I haven't found one in over a year of searching so after making a HUGE bow (that almost ruined my marriage) for the top of the tree that looked way to "model home" and "martha stewart" for my taste, I decided this year I would not do that to myself. Seriously, for a whole week my husband came home to me, every day, in tears surrounded by craft wire and yards and yards of ribbon, throwing things and shouting obscenities.

This year I decided to make my own angel. I look online for some tutorials and I didn't find any I liked. They all involved things I didn't have readily at home which I hate. Like, who has doll hair just hanging out in their office? Yea, not me.

So, here are the supplies you need:
2 pages White construction paper/card stock                     Glue Gun/Hot glue
Knitting Needle/Short skinny dowel rod                             Glue/Modge Podge
Lace /other fabric for the dress           1 big bead for head, 1 or 2 smaller for the neck
Interfacing                                                                          Gold craft wire
Small Hoop

The Body
First Step: Roll 1 piece of cardstock into a cone. Make sure the bottom is big enough to fit your tree and make sure the hoop is big enough to fit the bottom. The small hoop I used it from an old cross stitch projet I decided not to finish. My tree is only 6' but yours might be bigger. Glue with regular glue the hoop into the bottom of the cone. I find the hoop makes it a lot more sturdy. You don't want the angel to be crushed the first time you accidentally sit on it do you? You will have extra paper outside of the cone that doesn't connect. Trim that off.

Second Step: Take your knitting needle or crochet hook or dowel rod and hot glue it to the ring around the bottom and the opening at the top of the cone. This is where the head will go. Make sure it's as tall as you want. This is what the inside will look like.


The Dress
Third Step: Lay out the fabric exactly how you want it. If you have lace double it over. I got my lace from a garage sale, a whole yard for 10 cents. I'm really loving the scalloped edges so I made those a bit longer than my straight underneath layer so they will hang off the bottom of her skirt a bit. Roll the cone alone the bottom of the fabric. When the fabric reaches all the way around cut it straight down and across.


Fourth Step: Hot glue 1/2" intervals along the bottom of the cone where you want the lace to go. Make sure to do a dot at the bottom of the back and the top of the back edge. Now you will have a little cylendar of lace around your cone. Take in one of four corners at a time and hot glue it. make sure you only have 4 pieces glued so far. Then take the remaining four corners and glue those in too. This creates a poofy empire dress for the angel.


Neck and Head
Fifth Step: I had these awesome beads that i never knew what to do with that I bought in a market in Egypt, but you can use whatever beads you want. Glue the neck pieces to each other end to end. Set them aside.

Sixth Step: Cut some gold craft wire with wire cutters or scissors that you want to never be able to use again except for this purpose. Twist about half of the wire into a circle with your finger and twist the end of it onto the straight part. You're making a halo. Designate where you want the "face" of the angel to be. Hot glue the halo onto the "back of the head." Hot glue the bottom of the bead bead to the top of the neck bead and place them on the stick you used for the body.


Wings
Seventh Step: Take a piece of scrap paper and draw one half of how you want the wings to look. When you have it perfect, fold it in half and cut it out. Now, lay it on top of the lace and cut out a square around it. Then lay the square on top of the interfacing and cut a square of the same size of interfacing. 'Twas my step-mom that got me onto interfacing. It's wonderful. It holds fabric together, makes it a little stiffer, it's good stuff. Iron the interfacing to the lace. FOLLOW THE DIRECTIONS ON THE PACKAGE OF INTERFACING. I can't stress this enough. If you don't you can easily burn the interfacing and the lace. In my case, Put a damp cloth over the interfacing and iron lace side down. Press hard for 15 seconds but keep the iron moving. The reason we are using interfacing is so the wings will look softer instead of just looking like they were glues to paper. plus it will hold the edges of the lace together and they won't fray.


Eighth Step: Trace the paper wings onto the lace. Cut out the wings. Brush glue onto the back of the wings and press them onto cardstock. This way, they will not fold over on themselves and you can curl the paper back as I did. If you're using Modge Podge the paper will dry in just a few minutes. Cut it out and hot glue the middle of the wings where you want it on the cone or neck. Expirament with different heights to find the one you like.


Once you have the wings on you are done with basic construction. All that's left is for you to tart it up a bit how you want. I just put white and red satin ribbons down the front. Bonus points for my step-mom in the picture in the background. She looks so cute in that one.

Well, there you have it. If you have any questions let me know. If you make it send me pictures. Have Fun!

Wednesday, November 2, 2011

The Genteel arts Lesson 1: Decoupage

It's such a shame that what used to be the genteel arts are disappearing among women of my generation. What is seen as "old fashioned" and "boring" can actually be really freaking awesome if you put your own spin on it. Things like quilting, decoupage, embroidering, etc. are really fun and can be great ways to express yourself.

Decoupage is actually really easy. It is great for gifts because it looks so fancy. All you need is modge podge, paper, and something to stick the paper too. I have a wooden art case that I totally ruined by drawing all over when I had a garage sale because I got bored. I got an amazing gift bag from my sisters for my birthday that had flowers on it. So I cut out all the individual flowers.

Step 1: Assemble your supplies. Most people that I know use sponge brushes for the modge podge but I find sponges incredibly annoying and really hard to wash out. Plus, I tend to forget to wash them out at all most of the time and find ruined brushes all over the place. I have a set of 10 year old brushes that I use for this purpose. The fibers are falling out anyway so it's no big deal.


Step 2: Get a general idea of how you want the pattern to be. Don't be afraid to let it evolve as you do the project. I wanted my flowers to overlap. Paint the back of the paper and press it on to the wood or cardboard or photo frame or whatever. Press it down firmly and for about 30 seconds. Press down any edges that get squirly to make sure they stay put.


Step 3: Continue to paint each piece and lay it down where you want it. It's ok to use ripped pieces too. They come in handy for filling small spaces.


Step 4: When all the paper is on there however you want it and all pressed down. Paint over the top one whole layer of modge podge. This will give it kind of a glossy finish and polish it up. After you do that though, it might make it kind of sticky. Not so sticky that anyone but us would notice but still. So I like to spray mine with acrylic finish. it protects it a little.


And there ya go! Much better than that stupid black sharpie. I find this is really cute to do with Christmas wrapping paper on little boxes from a craft store. You can put little candy in it and a bow on it. Very inexpensive and very cute. Any kind of paper except very thin will work. Decoupage was very popular during Victorian times and if you google Victorian Decoupage you can come up with a ton of really cute ideas, or, if you want to cut out a lot of skulls and crossbones from magazines you can do that too.

Have Fun!